Play Gym Mat Tutorial:
This isn't a TRUE tutorial but it's a walk thru of what I did and what I used to do it.
There is 40 Squares about 5 inches in diameter.
The total size after it is sown is 32 inches square.
I used precut squares from Joann's Fabric and then I cut 10 extra squared to make 40.
The center square is 15 inches square. The over head part is made out of coat 4 coat hangers and pipe foam insulation (I bought it at lowes for 97 cents for 6 feet). I cut off a foot of that and made my "legs" 5 feet long. Then wrapped in fabric. Basically total yards in fabric is about 4. Then you need enough to cover the "legs" (the over head part.)You need the top fabric, the back side, and 2 layers of fleece or batting depending on what you want to use. I used fleece. You will also need a small amount of iron on "no sew heat bonding". You will need moderate sewing experience to do this project. It has it's challenges.
Tools:
rotary cutter for the squares
rotary square
scissors
hot glue gun
glue sticks
pins
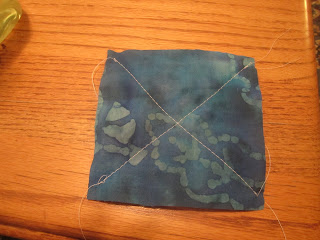
40 5 inch top squares.
40 4 1/2 inch fleece squares
Stick them together and put a couple pins in it. Doesn't need to be perfect you'll never see it.
Sow it together in an X pattern. Do all 40.
Lay out all your squares and pin them to a sheet to over view your layout.
Take one line at a time and sew them to any old piece of fabric, I used flannel (which is nice to use because the fleece sticks to it really nicely.) Make sure it is a couple inches bigger then your pattern so you have some play room. I pin it like this so that is was secure. Sow all the way down one side vertically then again down the other side vertically. Then after you've finished all the vertical sewing switch it horizontally.
This is my top sown to the piece of flannel finished. Cut off the excess fabric around the edge of the top.
Follow the instructions to the "no sew heat bonding"
After you iron it on check it to make sure it adhered well.
Choose your back and lay it on top of your top side with RIGHT sides together. I used the napkins from my wedding to make the back. :) But I would recommend something heavier. Lightly pin it farther in so the your sewing machine doesn't catch on them.
Then pin the second layer of fleece to the wrong side of your top side so it looks like this.
The layers should be wrong side of back showing and wrong side of top side to the fleece.
Sew around three sides leaving one side open to flip it right side out. Cut the edges straight across before you flip it.
Flip it, straighten it out, and pin 1/4 of an inch in like a hem. And sew across it then all the way around the edge of the mat. Then I applique the star on using this method:
http://sewlikemymom.com/applique-tutorial-curves/?utm_source=rss&utm_medium=rss&utm_campaign=applique-tutorial-curves
I made just a regular tube like piece for the center and it's about 6 inches long by 4 inches wide. It should fit on there SNUG.
You can do this part how ever you like I used three fabrics sown together to make the "leg". Make sure you have enough fabric to go from that center piece to about 3 inches past the end of your "leg".
Flip your center up a little as shown here to pin your "leg" fabric to the tubing.
I used I hot glue gun for this project because I knew it would be easier then trying to perfect the sewing. DO NOT LET THE GLUE TOUCH THE FOAM! It will melt! Lesson learned! Glue it all down one side then the other. Oh I didn't realize it was going to need the hangers until after I put it together but I would finish the fabric and then put the hangers through the tube.
This is the "leg" sewn on. I tell you this part is TRICKY! But just take it SLOW really SLOW. Also it helps if you have an industrial needle on your sowing machine because it need to go thru like 6 layers. Sew it in basically a triangle shape. I pinned all the legs on to the mat before hand. The photo on the right is the underneath side not finished I trimmed it up and hot glued the edge.
This is by boy chillin' :)
For the loops to hold the toys I used fabric like this and glue it with the hot glue gun. They about 1/2 inch in width and 1 1/2 inches long. I made 5.
Picture of them completely glued.
Here are they glued to the gym.
The finished project. :) Hopefully I didn't forget something but. YAH that is it!!


